This page has information about how to use MESA to evolve a single star.
It assumes you have already installed MESA (see Installing MESA). The You came here for a program that can use these modules to do
multi-step stellar evolution. You're in luck, because such a program
lives in the star/work directory, so that's where we'll start. You should perform and store your work somewhere other than the main
MESA directory. This will make your life simpler when you do a fresh
checkout of a new MESA version at some point in the future. Therefore
each time you want to start a new MESA project, you should make a new
copy of the star/work directory. Let's do that for this tutorial. Now that we have our copy of the work directory, we need to compile the
code that lives in it. The work directory already contains a set of simple configuration files
that will evolve a 15 solar mass star through on to the zero-age main
sequence (core hydrogen ignition). For now, you won't need to edit
anything, but you should take a look at each of these files.
We recommend you inspect these files using the binder environment, though you could also run e.g., vim from the terminal.
Running MESA
$MESA_DIR directory has lots of subdirectories.
Have a look at the contents of $MESA_DIR using ls $MESA_DIR or cd $MESA_DIR ; ls .
Most of these
subdirectories are modules (the "M" in MESA) that provide some
specific functionality (e.g., "kap" provides routines for calculating
opacities). The most important module is "star", which contains the
module that knows how to put the capabilities of all the other modules
together and advance the state of a stellar model by a single step and
then suggest a new time increment for the next step. Basically,
that's all it does.Make a copy of the star/work directory
cp -r $MESA_DIR/star/work ~/tutorialcd tutorial
./mkSet up configuration files
inlist
inlist is often used to direct MESA to read one or more other
inlist files.
There are five sections (technically Fortran "namelists") in star inlist files:
- star_job - options for the program that evolves the star
- eos - options for the MESA eos module
- kap - options for the MESA kap module
- controls - options for the MESA star module
- pgstar - options for on-screen plotting
Each definition in a namelist is of the form:
name = value ! commentValues are specified using the normal Fortran syntax. Blank lines and comment lines can be freely included in the list. Blanks at the start of a line containing a name-value pair are okay too so you can (and should) indent things to make them more readable.
All of the controls are given reasonable default values at initialization, so you only need to set the ones that you actually want to change.
Change the location of the MESA cache
Because we have pre-installed MESA for you, MESA will try to write cache data to the system directories.
This will cause permission warnings. To avoid this, we will change the location of the MESA cache.
Firsly, create a directory in your home directory to store the cache data using
mkdir ~/mesa_caches
Then, open the inlist file and add the following lines to the &star_job section:
&star_job

! set mesa cache to local binder env. to avoid permission errors
  ionization_cache_dir = '~/mesa_caches/ionization_cache'
  kap_cache_dir = '~/mesa_caches/kap_cache'
  rates_cache_dir = '~/mesa_caches/rates_cache'
Run MESA
Running the code is now as simple as typing:
./rnMESA will keep you updated via terminal output that looks like this:
step    lg_Tmax     Teff     lg_LH      lg_Lnuc     Mass       H_rich     H_cntr     N_cntr     Y_surf   eta_cntr   zones  retry
  lg_dt_yrs    lg_Tcntr    lg_R     lg_L3a     lg_Lneu     lg_Mdot    He_core    He_cntr    O_cntr     Z_surf   gam_cntr   iters
	age_yrs    lg_Dcntr    lg_L     lg_LZ      lg_Lphoto   lg_Dsurf   CO_core    C_cntr     Ne_cntr    Z_cntr   v_div_cs       dt_limit
  __________________________________________________________________________________________________________________________________________________

		200   7.468401  2.865E+04   4.240859   4.240859  15.000000  15.000000   0.699697   0.003104   0.280000  -5.917248    864      3
  3.3257E+00   7.468401   0.795655 -32.911837   3.063854 -99.000000   0.000000   0.280004   0.009379   0.020000   0.014657      5
  5.0236E+04   0.611187   4.374553 -99.000000 -99.000000  -9.031542   0.000000   0.001654   0.002085   0.020299  0.000E+00  max increase
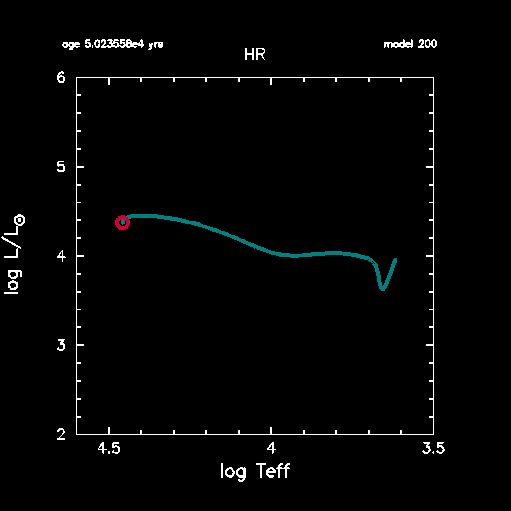
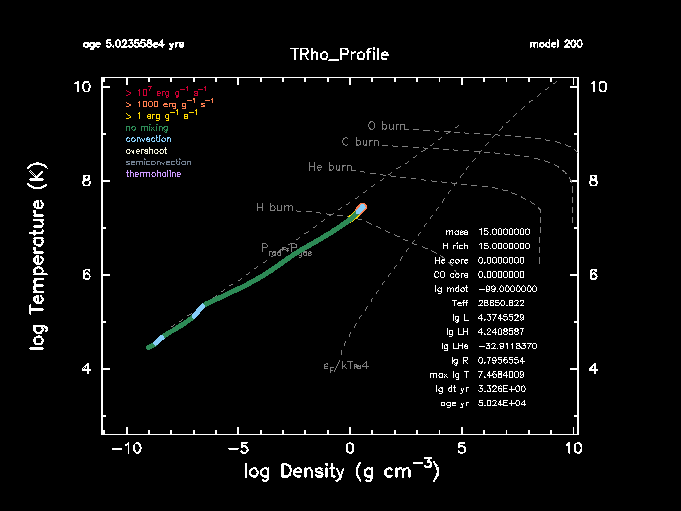
MESA will also display some pgstar plots that look like below. Note that it will take a hot second for these PGstar plots to open and MESA to continue.
This should run for 208 steps before stopping with the following message:
termination code: Lnuc_div_L_zams_limit
Note you can always kill the run by typing Ctrl + C in the terminal.
Resuming MESA
You are not limited to using the same parameter settings for an entire run. You can stop the run, edit the inlist file, and restart with new settings. This stop-restart mechanism has been carefully constructed so that if you restart from an intermediate state without changing any controls, you'll get exactly the same results. For that to work, the saved information must be complete, and that means there’s a lot of it. To make this run fast, the restart information is dumped in binary format. These binary dumps are referred to as “photos” and are saved in a subdirectory with the same name.
It should be emphasized that the photos are not intended for long-term storage of models. In particular, when you update to a new version of MESA star, you should expect your existing photo files to become obsolete.
If you scroll back in the terminal output from the run, you should find a line that looks like (though the number may differ slightly between MESA versions):
save photos/x849 for model 849 indicating that one of these snapshots was automatically saved when the run terminated.
Open up inlist_project in your editor. You can see there were two stopping conditions,
! stop when the star nears ZAMS (Lnuc/L > 0.99)
  Lnuc_div_L_zams_limit = 0.99d0
  stop_near_zams = .true.

! stop when the center abundance by mass of h1 drops below this limit
  xa_central_lower_limit_species(1) = 'h1'
  xa_central_lower_limit(1) = 1d-3
As MESA indicated in the termination message, we stopped because of the first condition (naturally, ZAMS is before H-exhaustion). Turn off this stopping condition by editing your inlist so that
stop_near_zams = .false. Now we can restart using the photo and our new settings. Try it.
./re x208 This resumes the run from model 208, but this time the run will stop when our other condition is satisfied, when the central hydrogen drops below 0.001. This will happen at model number 305.
Saving a model
Remember that the photo file is a machine readable binary that is not designed for portability to different machines or even to different versions of MESA. So we need another way to save a model so we can use it later, perhaps as a starting model for later runs, or to send to someone for them to use with their own copy of MESA. For example, if you find some bug in MESA, and the developers will want to see if they can reproduce it on their machines. You’ll be asked to save a model from just before the bug happens and send it in an email along with your inlist.
Let's save a model file at the end of our run. Go to the following lines to the &star_job section of your inlist:
! save a model at the end of the run
  save_model_when_terminate = .false.
  save_model_filename = '15M_at_TAMS.mod'
save_model_when_terminate to .true..
Save the file and then restart MESA from the same point as before.
./re x20815M_at_TAMS.mod. Take a look and see.
Loading a model
Now you could begin studying the post-main sequence evolution of stars, starting a new MESA run using the model you’ve just saved. In order to do this your inlist might look like:
&star_job
  ! see star/defaults/star_job.defaults

  ! start a run from a saved model
  load_saved_model = .true.
  load_model_filename = '15M_at_TAMS.mod'

  ! display on-screen plots
  pgstar_flag = .true.

/ !end of star_job namelist

&eos
  ! eos options
  ! see eos/defaults/eos.defaults

/ ! end of eos namelist


&kap
  ! kap options
  ! see kap/defaults/kap.defaults
  use_Type2_opacities = .true.
  Zbase = 0.02

/ ! end of kap namelist


&controls
  ! see star/defaults/controls.defaults

  ! options for energy conservation (see MESA V, Section 3)
  energy_eqn_option = 'dedt'
  use_gold_tolerances = .true.

  ! configure mass loss on RGB & AGB
  cool_wind_RGB_scheme = 'Dutch'
  cool_wind_AGB_scheme = 'Dutch'
  RGB_to_AGB_wind_switch = 1d-4
  Dutch_scaling_factor = 0.8

/ ! end of controls namelist
If you want to try this out, save the preceding text as a file named inlist_load
(i.e., save it as inlist_load, NOT inlist_load.txt)
in your work directory. Make sure your file ends with a blank new line.
Then edit your main inlist file so that it will use inlist_load instead of inlist_project
everywhere within inlist (i.e., extra_star_job_inlist_name(1) and extra_controls_inlist_name(1)).
Then as usual, do
./rn
and MESA will start up using your newly saved file. Note that the above inlist_load does not have a stopping condition, and so you probably want to end it early at some point. Unlike the photos, saved models don't have a complete snapshot of the internal state of the system. Photos are guaranteed to give the same results; saved models are not. There may be small differences when you run a saved model compared to what you saw in the run before you saved it. The differences should be minor, so you shouldn’t have to worry, but don’t be surprised by them.
Learning about the many MESA options
After looking at the previous inlist, your more pressing question may be “where did those options come from?” and “how do I find the options appropriate for my problem?”. Your first stop should be the instrument papers, which discuss the most important flags.
The files that contain a description of all of the MESA options and their
default values live in the directory $MESA_DIR/star/defaults
The options are organized by the namelist that they are a part of. So the file controls.defaults contains a discussion of options in the controls namelist.
Suppose we want to learn more about what this “Dutch_wind” is. Searching in controls.defaults for the word “Dutch” quickly leads to the following summary of these options.
      ! Dutch_scaling_factor
      ! ~~~~~~~~~~~~~~~~~~~~

      ! The "Dutch" wind scheme for massive stars combines results from several papers,
      ! all with authors mostly from the Netherlands.

      ! The particular combination we use is based on
      ! Glebbeek, E., et al, A&A 497, 255-264 (2009) [more Dutch authors!]

      ! For Teff > 1e4 and surface H > 0.4 by mass, use Vink et al 2001
      ! Vink, J.S., de Koter, A., & Lamers, H.J.G.L.M., 2001, A&A, 369, 574.

      ! For Teff > 1e4 and surface H < 0.4 by mass, use Nugis & Lamers 2000
      ! Nugis, T.,& Lamers, H.J.G.L.M., 2000, A&A, 360, 227
      ! Some folks use 0.8 for non-rotating mdoels (Maeder & Meynet, 2001).

      ! ::

    Dutch_scaling_factor = 0d0


      ! Dutch_wind_lowT_scheme
      ! ~~~~~~~~~~~~~~~~~~~~~~

      ! For Teff < 1e4

      ! Use de Jager if ``Dutch_wind_lowT_scheme = 'de Jager'``
      ! de Jager, C., Nieuwenhuijzen, H., & van der Hucht, K. A. 1988, A&AS, 72, 259.

      ! Use van Loon if ``Dutch_wind_lowT_scheme = 'van Loon'``
      ! van Loon et al. 2005, A&A, 438, 273.

      ! Use Nieuwenhuijzen if ``Dutch_wind_lowT_scheme = 'Nieuwenhuijzen'``
      ! Nieuwenhuijzen, H.; de Jager, C. 1990, A&A, 231, 134

      ! ::

    Dutch_wind_lowT_scheme = 'de Jager'
You can browse through the .defaults files to familiarize yourself with what's available. It can be easy to be overwhelmed by the shear number of options. That's where the test_suite comes in handy. (See Part 2 where we will start from a test_suite example.)
- © Untitled
- Design: HTML5 UP